Monday, February 8, 2016

My Chalkboard Print

This sounds weird, because it's not my usual start of the week attitude, but thank goodness it's Monday!  This weekend was horrible.  My hubby came home on Friday with a temp of 102 and feeling miserable.  On top of that, I was starting to fight a nasty cold.  Yep, the goomba my kids got last week passed onto us...at.the.same.time.  This means that my kids ran wild all weekend long.

Luckily, we are both doing better.  At least we're good enough to get back to daily life tasks without dying.  Now my day today will be spent cleaning my house.  It's amazing what h**ll breaks lose when I am down and out.  Seriously, I'm sticking to my kitchen floor here and I don't want to even talk about the bathrooms.

For all of these reasons, I am going to focus on a project I did around Christmas time and it is now in a conspicuous spot right as you walk in my front door.  I love it THAT much.

It's my framed chalkboard wall hanging thinga majig.  Do you recognize it?


You may have seen something just like it on the Dear Lillie Blog.
I followed a tutorial from Dear Lillie that is super easy.  Honestly, I put the whole thing together...no help from the hubs.  This is a digital download that I got from Dear Lillie as well.  You can go here to look at what she has now.

Why did I do a digital download?  Because I am LOUSY at hand lettering.  Yep, cannot do it.  I am jealous/dislike very much those who have this talent.  I will work on it though.  Under this digital print is a painted chalkboard surface that I can do my own lettering on if and when I develop this talent.  Until then, I'll keep purchasing digital downloads.  I like to get them on sale.  I've bought two so far, and both cost me about $5.00 to purchase.  The printing cost was maybe $3.00 at Staples.  Not bad.  To make the frame to hold the prints, I probably spent $30.00.  I'm not too upset about it because it's a one time cost.  

Here's the print I have in the frame right now.


I like this one because it reminds me that life is good.  Plus, it's pretty generic so I don't have to change it out again any time soon.  Maybe when I do need to I'll be able to do my own lettering.  Meh...probably not.  One more shot that doesn't show my disgusting house.  Isn't it great how you can do that with pictures?


What do you think?  Is this a quick project you want to tackle?  I'm super happy I did!

Happy Monday,

Heather

Linking to:


Sunday, January 31, 2016

I Love Dips!

This last week has been a rough one around this house.  #3 has missed a week of school trying to get over a flu bug and I've been suffering from a migraine.  They kill me and my productivity.  I thought I would finally get around to writing a post today since it is snowy and I am all snug and comfy inside watching it fall.  Yep, I'm one of those weird people who love winter and snow over summer and sunshine.  I have a problem, I know.

I just want to share a really quick snack fix that I love to make for lunch...all of the time.  Not kidding, I think I eat these a couple of times a week.  I'm talking about potstickers here.  Love these little things of stuffed goodness.  However, I don't think they're all that great unless you have a good dip for them.  This is mostly about the dip.  I believe that a good dip or sauce makes EVERYTHING better.  I'm a dipper, what can I say?

So here goes, my recipe for potsticker dip.  I think this has just the right combination of sweet and tang.  Also, it takes about 2 minutes to make.  No need to wait for this goodness.  Here are the ingredients...


You need 
2 Tbsp. rice vinegar
2 Tbsp. soy sauce
1 tsp. sesame oil
A couple of dashes of hotsauce (I like Cholula or tabasco)
A couple of dashes of ground ginger

Put all of this together in a small sauce pan and bring to a simmer on low heat.  Then just turn it off  and let it sit while you make your potstickers.

I honestly do not make my own potstickers.  I buy a frozen bag from Walmart and follow the directions to cook them.  I do let mine brown just a bit because I like a bit of the soft and crunchy in my potsticker.


Oh yum!  I want to make these every time I look at this picture.  You can always dress this up with some sliced scallions or fresh parsley but hey, I'm just eating them for lunch and I was hungry so dressing this up didn't interest me much at that time.  I was lucky to get a picture.  But, you know, if you want to impress company or something, go ahead and make it even prettier.  This works for me for everyday though.  One more shot.


Are you ready to try these yet?  I dare you to.  They are so easy and soooo good!

Happy Sunday!

Heather

Linking to:

Saturday, January 23, 2016

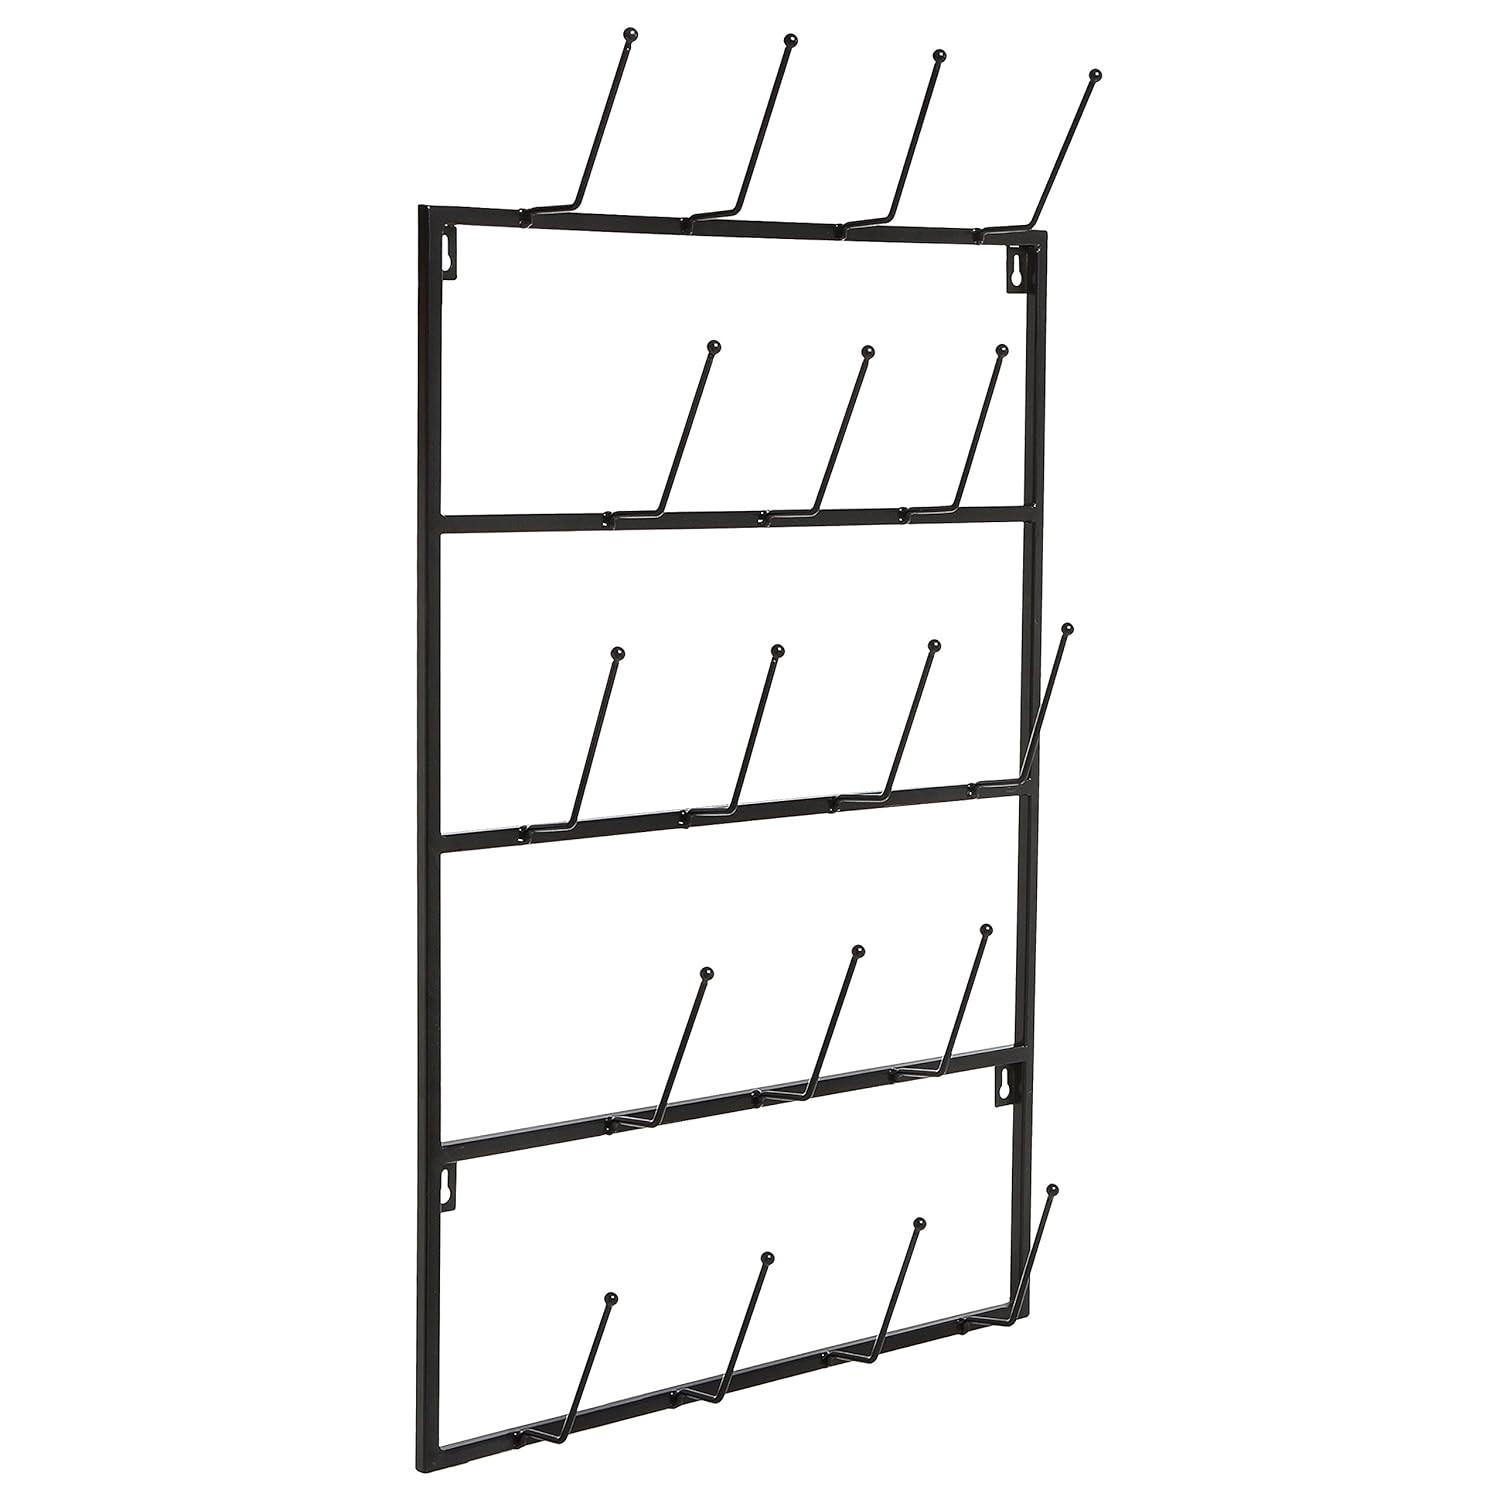
A Mug Rack You Can Actually Afford

For soooo long I have been obsessed with these mug racks that hang on a wall.  I just love the vintage yet simple look that you can get with these.   I fell in love with them when I saw this one in Joanna Gaines' home on Fixer Upper.  I watch this show all.the.time!  Drives my husband nuts!  By the way, they don't seem to sell this at Magnolia Market anymore.

GREAT WAY TO DISPLAY GLASSES. On Their Renovation - Get to Know <em>Fixer Upper</em> Hosts Chip and Joanna Gaines on HGTV:


I knew if I had one of these, it would free up some space in my cabinets.  Who would have thought that my bigger house that we moved into in May actually has less cabinet storage that the old house did?  That is my luck...go figure.  Still I love being here and and overall everything works a bit better. 

 One problem...I didn't really have enough space for one of these.  Why?  I have a TON of windows in this home.  This is both a curse and a blessing.  I adore all of the natural light, but it doesn't leave much room for hanging anything on the walls. The other issue was the price.  Anything I could find was well over $100 dollars.  Ya, no way.  This one from Ebay is right at a $100 bucks.  Still more than I wanted to spend and still too big.

French-Inspired-Bottle-Drying-Rack-Wall-Mug-Rack-Organizer-Vintage-Reproduction


In comes Amazon.  Are you a Prime Member?  I have been for about 3 years now and I order everything from here.  Kids shoes, clothes, household items, food for the zoo.  I love it and it's free shipping so why not.  I can find things online that my small little town doesn't offer.  Here's what I found.


Hallelujah!  It was the right size, right price, and exactly the look I wanted.  This baby is $37.00 with free Prime Membership shipping on Amazon.  Yes please!  So what did I do?  I bought it, didn't even think twice.  And I love it!


It is a bit shorter than the other mug racks I found online but heck, 5 rows?  That will do it for me.  It also is just narrow enough to fit between my window and the edge of my upper cabinets.  I am loving it!  I actually need to buy a few more white mugs to fill it out.

Now I'm moving on to finding one of these little cute little things.  You can find this three tiered bin on Magnolia Market for $145...eek!  Way to rich for my blood.  I'm on the search, I'll let you know if I find a good deal.  But I really do want one.  Whine.

Three-tier Bin


Have a good Saturday!  I'm just going to sit here and keep drooling over this little metal creation.


Talk to ya later,


Tuesday, January 19, 2016

New Attitude

So I've been thinking about what direction I want this blog to follow.  As I've mentioned before, I've started a new jewelry business and wanted an avenue to share what's going on with it.  However,  I still am and always will be in love with home decor and anything about life with a family.

I briefly entertained the idea of having two separate blogs to highlight both of my interests.  Well guess what?  To h$** with that!  Excuse my language.  I really don't want 2 separate blogs because that is just too much for me to manage.  Not to mention it just adds more complication to my life when I am really just wanting to simplify.

The other issue I have been struggling with is that much of my design in both jewelry and home decor is not what is the most popular out there.  I mean I love all of the people I follow on Instagram and Facebook but I finally decided that I need to just go with what works for me.  So what you may see here may not be what is trending...some might.  I am just going to be true to me.  I can live with that and I hope that the few readers I have can too.  This means that you will see things jump all over the place on this blog.  Some of my posts will be about jewelry, some home decor, some cooking. Basically, whatever floats my boat and is interesting to me.  I am most interested in just being authentic.

Now that I have that off of my chest, I want to talk about my new dining room set.  I have lived with my parent's old hand me down table and chairs from the 90's for about a decade now.  It has served us well and I never worried about the scrapes and dings my kids and animals delivered to it.  However, the whole time, I secretly detested it.  I'm just not into white tile, honey oak, and blue flowers.  You may ask why I never refinished it.  Well, because it just seemed like too much work for something I new I still wouldn't be satisfied with.  Yuck!


The other issue has been that I've never found something that really worked for me.  At least not something that didn't cost thousands of dollars.  Not exactly rolling in the money here.  I have Pottery Barn envy on a Target budget.  Sometimes I can't even afford that.  Has anyone else noticed how expensive Target can be sometimes?

Well, my husband finally took pity on me and got me a dining set for Christmas!  Oh happy day!  I ended up piecing my set together from several different places.  The table I found at Down East Furniture.  I didn't like the chairs that could have come with it.  Not quite my style and I've just never been into the matchy matchy look.  I found a couple of benches in an understated white finish from Target.  The benches just worked better for the limited space I have.  Finally, I found two upholstered end chairs from Wayfair.  I love that website.  L.O.V.E.  Really like the chairs too.  My kids complain about not getting nice soft chairs to sit in like my husband and I now have.  Hmmm, life is tough isn't it.


The whole thing is exactly what I have been looking for all of these years.  The table is a nice stained farmhouse trestle style that doesn't clash with my stained cabinets.  The benches and chairs, I think, balance it out so the set doesn't look too dark or make my space look heavy from too many wood finishes.

I am sooo happy!  I finally have a dining set that doesn't cause me embarrassment or make me cringe every time I think about it.  Do you still have furniture you hate and wish you could get rid of?  Ya, me too, but now there is 1 less piece I have to hate.

Linking to:

36th Ave.
Link Party Palooza
Practically Functional
Dear Creatives
DIY Show Off


Tuesday, November 10, 2015

Thanksgiving Decor On the Cheap

I have a confession...I haven't really decorated for anything very much over the last couple of years.  It is mostly because I was just really busy and maybe a little lazy unmotivated.  This year though I had fun decking my house out for the fall which I think is my favorite season to get ready for.  Hands down, Thanksgiving is my favorite holiday.  I know most people don't feel this way but I love the low key atmosphere and the opportunity you have to get together with people whose company you enjoy good food.  My mouth is watering just thinking about the food.

With how long it's been, when I went down to pull out all of my fall decorations they almost seemed new to me.  I did make a couple of little changes just to lighten things up a bit but everything else was something that I already owned or got for free.  I love it when that happens which, I admit, is almost never for me.

I wanted to incorporate a little of the plaid that has been EVERYWHERE this year.  I've always loved plaid and I'm glad that the current design has finally caught up with my forward thinking.  Bwahahaha!  Joking.  But seriously, I do love it because I've always had a love for that preppy look.  Soooo, I sewed a few new pillow covers.  They really warmed up my space I think.


I had the cute cream flower pillow that I think I bought at Target a couple of years ago. I die over their pillow isle. The dark plaid was something I already had buried in my fabric stash...I have a fabric addiction, I admit it.  The material on these pillows is also really soft and makes you want to snuggle in with a good book.

I also did a few arrangements on some of the tables I have in my great room area.


 All of the gourds came from my moms garden.  She grows them every year and gave me a full grocery sack full.  Since they were free, they are a main piece in my table arrangements.  The ivy came inside from my patio table before it froze for the winter.  The pinecones are the cinnamon scented ones that I can't resist...they smell so good!  The dish they are all sitting in used to be an obnoxious yellow.  I spray painted it a cream color which is much more neutral.  I think the silver tray came from Tai Pan a couple of years ago too.


This tray is sitting on my kitchen table.  Again, there are quite a few gourds in this one and I added another ivy and some pine cones.  There are also a couple of pumpkins I covered in book pages forever ago...they are old but usable.  I love how everything is just spilling out of the wood container.  It kind of speaks to the bounty of the season I think.  Please ignore the 90's style table...working on that.

Finally, I did something very simple on the console in my entry way and it is probably my favorite just because it looks so clean.


There you go, simple and sweet.


The Always Be Thankful sign - I can't quite remember where I got it from.  The frame it is in used to be black and gold.  A little cream spray paint, and I like this look so much better! 
I love the reminder that this is the time of the year to be thankful for all of the blessings we have.  Although I see many wrongs in today's world, I find it best to focus rather on how richly blessed I truly am.  What have you done in your home this year to bring to mind all we have to be thankful for? 


Happy Tuesday!

Heather


Linking to:

Home Stories A to Z
My Uncommon Slice of Suburbia
The Turquoise Home

Tuesday, November 3, 2015

Piano Bench Recover

I had a problem.  An ugly piano bench cover.  I mean, really ugly...why did I ever think this looked ok?  I recovered this mossy green monster about 5 years ago when we got our new/old piano.  The piano has worked out well for us but the cover didn't quite jive with what I wanted in my music room/command station room as I like to call it.  I know that's a weird combination but I needed a place where I could keep all of our paperwork under control and we also needed a good place for our piano as our new home doesn't really have a good wall in the general area to place a piano.

All right, here is my cringe worthy reveal:

 
Pretty bad, huh?  Well I came up with a solution.  I went down to my fabric stash and was amazed at what I found.

Isn't this fun swirly pattern on a dark gray background so much fun?  Well I thought it was...and you have to admit is a huge improvement on the ugly green stuff.


All I did was pry out the old staples on the back of the padded board with a flat head screw driver.  Then I took this stapler and stretched my new fabric around the seat and stapled in place.  Gotta love the easiness of this project.
 
 
So much better!  I'm loving it again.  This piano was bought used.  I'm not sure how old it is but it came in great condition.  I know a big trend right now is to paint pianos.  I'm all for painting furniture, but this is something that will always stay its original color.  I love it just how it is even with all of its nicks and bangs.  Wow that sounds like a great life lesson...totally unintended.
 
Now the bench goes a bit better with the command station that I'm still working on to get it how I want.  It think I've gotten a pretty good start though.
 
 
It's so much easier to organize all of the paperwork that comes with a family of 6.  It is super convenient and right off of my kitchen so I can hear if chaos starts.  Believe me...that's important around here!
 
Happy Tuesday!
 
Heather


Linking to:


Wednesday, October 28, 2015

Casters Make Everything Better

So the last little bit has been busy even though I have converted from being in a full time healthcare career to a full time stay at home mom.  By the way, I love it!  As I mentioned in my post at the beginning of September, I have been trying to get a Handmade Jewelry Business up and running.

On top of that, and the general chaos of running a house with 4 boys, I am trying to do all of the catch up associated to moving into a new home. You know, all of the decorating and completing projects that were on hold due to my full time, out of the home, job.  It is sooo much fun to have a blank slate for new idea though.  I love it - my husband HATES it.  Couldn't be because his honey do list grows?

Even simple little projects have escaped me for awhile.  For example...the family that owned our home previous to us had four little girls.  My boys are still sleeping in beautiful lavendar and pink rooms.  My six year old is offended that this is what he has to endure.  Jeesh!  Don't worry...I have plans for their spaces.

One of the simple little projects that I did (took me all of 10 min.) is complete.  Here's a hint of what it involved.  Casters.  I love these little things.  When you put something on wheels it just makes it a little bit more.;)  I had bought my youngest two a little open book shelf from Walmart.  Eventually, it will be incorporated into the new decor although it doesn't look bad against the pink walls right now - kidding.  The problem was, the book shelf when put between their two beds sat directly over the only register in their room.  Uuugh!  So I put casters on the bookshelf to elevate it and make it a bit more mobile.

And yes, I was washing the sheets when I decided to take these photos so just try to ignore all of the junk you see in them.  If you are like me, it just helps to know that everyone is human and they actually have to do laundry.  This was a simple matter of screwing the casters in place with a power drill.  I didn't even drill pilot holes.  Gasp!


See how this makes it so the bookshelf/bedside table clears the vent?  My mad plan worked perfectly!


And tada!  It is finished, elevated, and moveable.  Now to just convince my boys not to push it down the hall like a skate board.  The fun never ends around here!

Whoops, almost forgot.  The total cost for this was about $50.  That includes the book shelf and all of the casters.  Not my cheapest project but cheaper than most bedside tables.  Plus, there is more storage for all the toys.

Happy Wednesday!

Heather


Related Posts Plugin for WordPress, Blogger...